Peter Smith

GBP/USD is working to stabilize following a sharp decline that cleared external liquidity - and how price behaves around a key retest zone may define the next meaningful move higher. According to The Gunslinger, the recent sell-off swept sell-side liquidity before price recovered, leaving behind a structure that now points toward a possible continuation upward if the right confirmation develops.
The Liquidity Sweep That Set Up the Trade
On the 4-hour chart, the sequence is fairly clean: price pushed below prior lows, took out sell-side liquidity, then reversed without closing beneath that level on the relevant timeframe. That distinction - reacting without a confirmed close below - is what separates a liquidity sweep from a genuine breakdown.
Price reacted after sweeping external liquidity - no close below on the relevant timeframe, which changes the whole picture.
This reading aligns with the kind of institutional order flow logic that forms the basis of liquidity-based trading frameworks. Rather than chasing the breakdown, the idea is to wait for the market to retrace and offer a more structured entry point.
The GBP/USD Confluence Zone: 3 Overlapping Factors
The chart highlights a green zone sitting below current price - and it is the structural heart of this setup. Three technical elements converge in that area:
- Range low (RL) - the lower boundary of the recent price range
- Breaker structure - a displaced order block from the prior move
- Fair value gap (FVG) - an imbalance left behind during the sweep
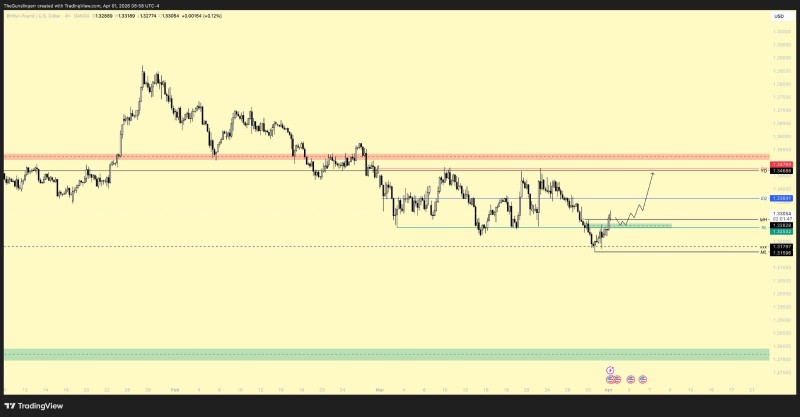
The confluence zone below is where I want to see a reaction - range low, breaker, and fair value gap all stacking in the same area.
No entry is considered until price returns to this zone and shows confirmation on the 15-minute timeframe. The conditional nature of the setup is deliberate - confluence alone is not enough without behavioral confirmation at lower timeframes.
Upside Target: The RH Level and Yearly Open
Above current price sits the RH level - defined as the take-profit zone. This area carries additional significance because it overlaps with open sell-side liquidity and the yearly open (YO), making it a technically meaningful target rather than an arbitrary price.
The structure is fairly straightforward: price sits between a lower confluence zone that represents a potential entry on retest, and an upper liquidity target where resting orders are likely to be drawn into. Direction depends entirely on how price interacts with the support zone during the anticipated retest.
Between the confluence zone below and the open liquidity above, the range is clearly defined - now it is about what price does when it gets back there.
Why GBP Over EUR Despite Broader Market Bias
One detail worth noting: despite broader market expectations favoring the euro, this analysis expresses a preference for GBP within current conditions. The reasoning is structural rather than macroeconomic - specifically, how GBP reacted after the sweep and the quality of the setup that followed. EUR structure, by comparison, is described as less clean at this stage.
For now, GBP/USD remains in a reaction phase. The framework is defined, the levels are clear, and the next move depends on whether price can revisit the confluence zone and offer the lower-timeframe confirmation the setup requires.
 Peter Smith