Sergey Diakov

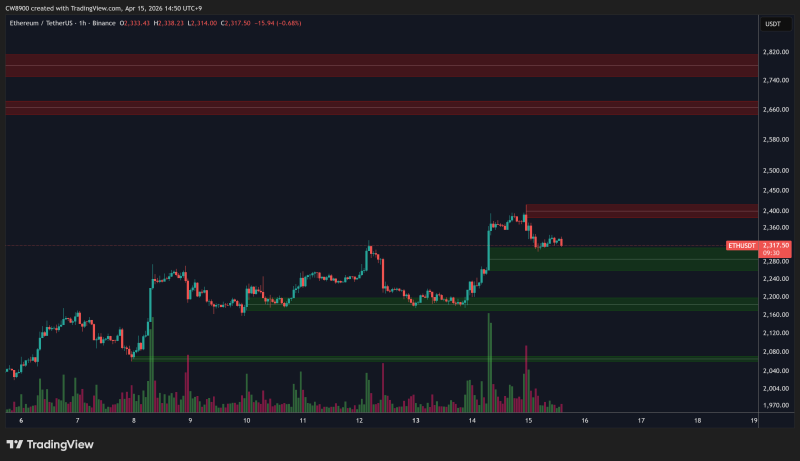
Ethereum is back at a level that has mattered before. After a stretch of range-bound trading and a rejection near overhead resistance, ETH is drifting into a demand zone that previously acted as a launchpad - and the market is watching closely to see if it holds. With a sell wall sitting at $2,400 and a second resistance cluster near $2,665, the structure above is clearly defined. What happens at the buy wall below may set the tone for the next meaningful move.
Ethereum Rotates Toward Demand Zone
Ethereum is pulling back into a clearly marked demand area after failing to push through overhead resistance. Analyst CW points to a stacked supply structure capping the upside, with an immediate sell wall sitting near $2,400 and a second resistance zone positioned around $2,665.
The pullback looks controlled rather than impulsive - price is returning to liquidity, not breaking structure.
A sell wall sits around $2,400, with another higher resistance zone near $2,665 shaping the broader structure.
The current demand region aligns with a consolidation zone that formed before the last upward move. This type of behavior has been a recurring feature in recent Ethereum setups, where Ethereum tested $2,400 resistance after rebounding from $1,700 lows - price revisits support, absorbs selling pressure, and then decides on the next move from a stronger base.
Overhead Supply Keeps ETH Resistance Intact at $2,400 and $2,665
The area above current price is not a single wall but a layered structure. The first barrier at $2,400 aligns with recent rejection points and marks the most immediate ceiling. Above that, the $2,665 zone creates a second, higher supply level - together forming a stacked resistance setup that has repeatedly defined the upper boundary for ETH.
Price is positioned between a buy wall below and layered sell walls above, compressing Ethereum into a clear decision zone.
Multi-layer resistance of this kind tends to delay continuation. The market has to work through each level individually, and repeated failures near the same zones reinforce their significance over time. ETH price has already been eyeing a $2,190 breakout, meaning bulls have had to flip multiple resistance levels before reaching the current structure.
ETH Price Structure: Buy Wall vs. Sell Wall Setup
Right now, Ethereum is not showing a confirmed breakout or breakdown. Instead, it is in a compression phase between two competing forces - demand building from below and supply pressing down from above. The chart reflects a market in a decision-making state.
- Buy wall located below current price
- Sell wall established at $2,400
- Higher resistance near $2,665
- Price positioned between demand and supply
If the buy wall holds, price may rotate back toward resistance. If it fails, the market could seek lower liquidity.
This kind of range-bound setup typically resolves with a reaction at one of the boundaries. A defense of the buy wall opens the path back toward the $2,400 level, while a breakdown below demand would shift attention to lower liquidity zones. Prior to the current setup, ETH was already testing critical $2.1K support as a Power-of-3 pattern emerged - adding context to how meaningful the current demand zone really is.
For now, Ethereum remains range-defined. The interaction between the buy wall below and the sell walls at $2,400 and $2,665 will determine which direction price resolves - and how sustainable that move turns out to be.
 Sergey Diakov