Peter Smith

SPY is approaching a pivotal moment as price moves between clearly defined technical levels, with both buyers and sellers reacting at key zones. Analysts Esther & Michael have outlined the structure in detail - the chart reflects a market in consolidation, where pressure is building and a breakout or breakdown will determine the next directional move.
The $674–$675 Level That Could Flip SPY Control
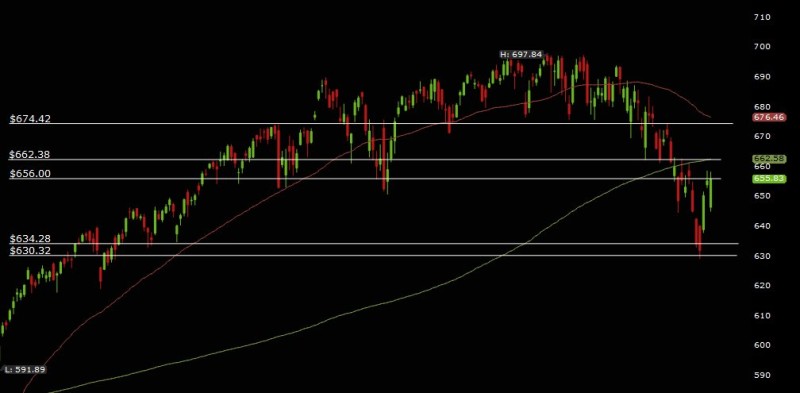
The $674-$675 area is the trigger level - a zone that marks where the last major breakdown began, and the chart shows price reacting below it.
If price returns to this region and fails, trapped buyers may look to exit. A reclaim and hold above this level would signal strength and suggest buyers are regaining control.
This creates a classic overhead supply situation. Failure here would reinforce it as a lower high, keeping pressure on the structure.
This type of setup is often seen during consolidation phases in SPY stock, where repeated tests of resistance define whether the trend resumes or stalls.
The Zone Where SPY Bulls Must Prove Strength
The $656-$662 range is the battlefield, aligning directly with the 200-day moving average. The chart confirms this area as a key reaction zone, with price currently interacting around it.
This level combines multiple technical factors:
- Prior support that has turned into resistance
- The 200-day moving average acting as a widely watched institutional level
- Repeated reactions showing indecision
Acceptance above this zone would shift market structure back toward bullish conditions, while rejection would indicate that sellers remain in control.
SPY holds key lows as bulls face a critical test at mid-650 support - similar behavior has appeared in recent coverage, reinforcing just how significant this cluster of levels has become for institutional participants watching the 200-day line.
The SPY Support Level That Defines Risk
On the downside, the $630-$634 area serves as the line in the sand. The chart shows this zone previously acting as strong support, where buyers stepped in aggressively.
Its importance lies in how price reacts on retest:
- Holding the zone suggests absorption and potential stabilization
- Losing it opens downside liquidity and increases the risk of accelerated selling
This level defines the lower boundary of the current structure - losing it doesn't just break support, it removes the floor entirely and invites a deeper move.
That dynamic also fits the broader rebound-versus-breakdown setup described in SPY rebounds 5% from buy zone as Elliott Wave structure holds.
SPY remains locked between resistance and support, with price compressing inside a defined range. The next move depends on whether buyers can reclaim higher levels or sellers push price below key support - turning consolidation into continuation.
 Peter Smith