I’m pretty sure you use images for your social media content, but are you using animated visuals?
Social mediaplatforms have transformed into a battleground where companies fight to capture their audience’s attention. And everyone wants to create posts that get noticed in social media feeds.
As it turns out, static images aren’t producing as much engagement as they did a few years ago. Ever since video contenttook over, stagnant images just aren’t enough anymore.
This is the main reason why you should consider animated visuals for your social media content.
Why You Should Consider Creating Animated Visual Content
People’s short attention span combined with an abundance of social media contentequals a highly competitive market where it gets harder to become noticed. As your target audience scans their newsfeed, their brains decide which content they’ll focus on in a fraction of a second.
Animated visual contenthas the power of cutting through the noise and hooking people because it adds some movement to a newsfeed that’s mostly static. This means that it has the potential of stopping people from scrolling down their feed. Animation is also a great alternative to creating videos because it combines drawings, photographs, graphics, or text into moving pictures.
The Benefits of Using Animated Visual Content
Wondering how animations can impact your social media promotion? The main benefits I noticed are:
- It’s a no-brainer to create animations. A lot of marketers are hesitant when it comes to video production because it takes time to master. The good news is that animated content represents a fantastic alternative that doesn’t require any particular technical skills (like how videos do). This means that it’s not only easy to create these type of visuals, but it also shows that everyone can do it, even those who don’t know graphic design.
- Creating animated content won’t break the bank. Luckily for us marketers, there are plenty of tools that we can use to create beautiful, eye-catching visuals. Best of all, the majority of these tools either offer a free trial or cost up to $20-$30 per month, depending on the plan. So you can reassure your manager that you won’t need a large budget for animated content creation.
- Visual content is better digested. With the help of animations, you can show and explain a concept in a matter of seconds. We already know that people don’t read content nowadays, they just skim through it. So, animated material represents a great addition to written content.
- You create something interesting. When executed properly, animations are more appealing and noticeable than a static image or plain text. Animated visual content also brings concepts to life that text or live videos can’t. For example, you can make numbers/characters fly, move, disappear, etc.
- There’s no limit regarding content format. This is incredibly important because every social media platform has its own dimensions for each type of material you want to create (post, cover, ad, thumbnail, story). Essentially, animated content works great for eCommerce ads, simple posts, product announcements, offers, and much more. So, you can use it creatively regardless of your industry.
- You choose where you want to focus people’s attention. Through animations, you have an easier time emphasizing the most important part of your message. For example, you can create an animation that promotes a new feature, or a discount you’re offering such as free shipping.
- You choose the complexity. When you’re just getting started with animations, you’ll probably create simple materials that don’t require a lot of thought or time. At first, it’s important to get used to the process of creating animations. Then, you can scale your work and create more elaborate materials. You have full control here.
What Tool You Can Use To Create Stunning Animated Content For Social Media
Whenever I need to create a visual, whether it’s a static image or an animation, I use Bannersnack. It’s a complex, yet easy to use online design tool, which was developed for those who are not professional designers.
While you can do many different things with the tool, in this post, I’ll show you how amazing and seamless it is when it comes to creating animations.
Without further ado, here’s how Bannersnack can help you create thumb-stopping animated visual content.
Introducing Bannersnack
Wondering what makes this online design tool stand out among others? Here are its main features:
- Choose the size format of your animated content. You can simply choose between covers (for Facebook, YouTube, Twitter, LinkedIn), ads (for Facebook, Instagram, Twitter), story (for Instagram), or regular posts for all of these social media platforms. That way, you won’t have to think about the different requirements of these platforms whenever you need to create visual materials.
- Templates ready to use. One of the best things about Bannersnack is the fact that you have plenty of animated templates you can choose from. If you need to create something quick and easy and you don’t have inspiration, then this tool can do the work for you. All you need to do is to choose the template. Then, you can customize it however you want.
- Magic animator. Bannersnack really works like magic because it offers the possibility to animate a template in a just one click. The tool provides a few different options when it comes to transitions so you can definitely find one that will match your banner.
- Banner generator. This feature helps you create full sets of animated banner adsat once within minutes. This is extremely helpful, especially when you need to create animations for multiple social media platforms.
- Import your own brand assets. Even though Bannersnack offers hundreds of stock photos, fonts, text presets and cliparts, you can personalize your animations even further by adding your own brand assets, including SVG files, and saving your color palette.
- Resize button. At the moment, Bannersnack has the most advanced resize featurethat you can find in an online design tool. This feature uses an algorithm to resize your designin just one click. Not only that, but it will also adjust and scale it based on its current size and layer alignments.
- Save the animation in different formats. You have the option to download your animation in HTML5, MP4, GIF, and AMP.
- Animations timeline. The timeline is going to help you streamline your workflow. It’s complex, intuitive, and it has a user-friendly interface. In this section, you’ll find all the layers you have in your banner so you’ll be able to customize every single one in just a few clicks.
- Collaborate as a team. Team productivity can be achieved by working together and collaborating on design projects. With Bannersnack, team members can easily access other people’s animations and make the necessary changes directly in the platform.
Now that you’ve seen all the amazing features Bannersnack has in store for its users, I’m going to show you how you can use them to create beautiful animated visual content for social media.
Choose the size format of your animation
The free plan allows you to create animations for one dimension at a time, while the paid plans will let you use the banner generatorand create multiple animations at once.
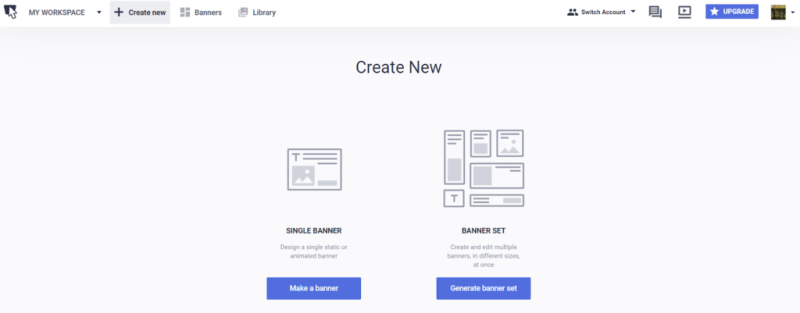
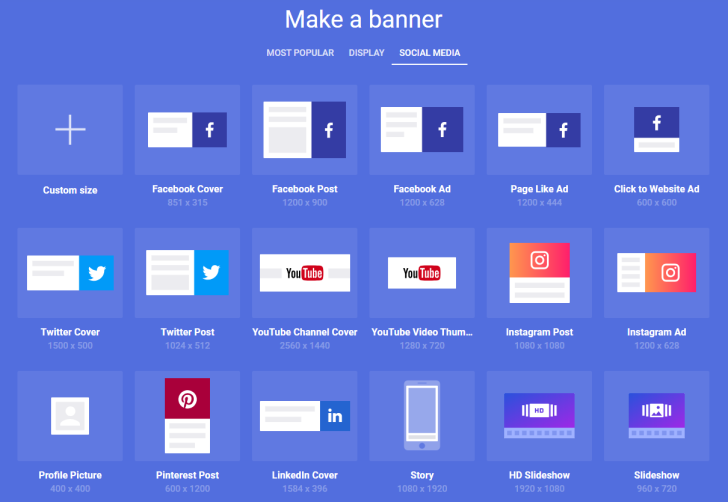
After you click on “Make a banner”, you’ll be presented with all the available options for banner sizes. Just select “Social media” to see all the ones you can choose from.
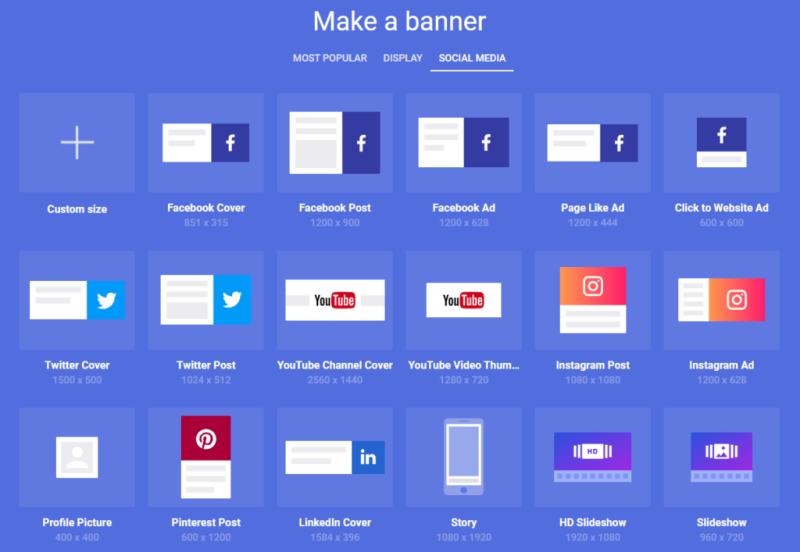
After you click on the desired size, you will be taken to the editor.
Decide how you want to start creating the animation
After you’ve selected the animation size, it’s time to decide how you want to create it.
Here are your options:
- Start with an animated template. If you’re new to these kind of tools, then this is the best option for you. Bannersnack offers plenty of templates to choose from, so chances are you can find something you’ll like. You also have several categories to choose from so it’s easier for you to find the template that fits your needs.
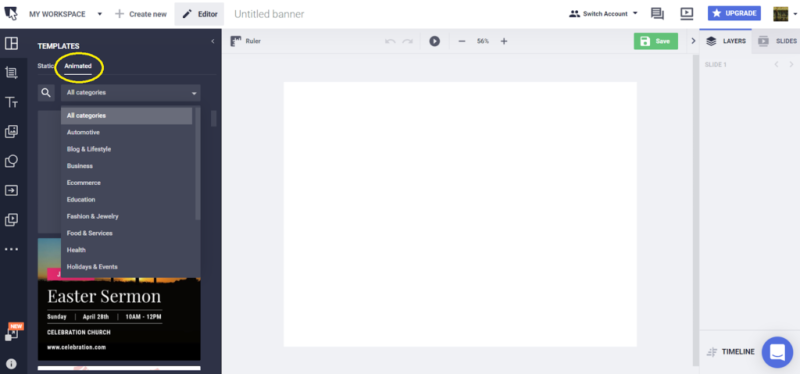
- Start with a static template. There are also plenty of images that you can use and animate yourself. This is a great option especially when you want to familiarize yourself with the tool, see how you can use it, and discover its features.
- Start from scratch. If you already have an idea on the animation you want to create, then you can start from scratch. You can either use the stock photos that Bannersnack offers, or upload your own images and use those. Alternatively, you can start with a colored background and work your way from there. The possibilities are endless.
I would also recommend adding fonts, images, or other custom elements you want to use in your designs before you start creating an animation.
Use the magic animator
If you want to create an animation in just a few minutes, then you will love this feature.
First, you want to choose an animated template, and then click on the Magic animator button that you can find on the left side of the editor.
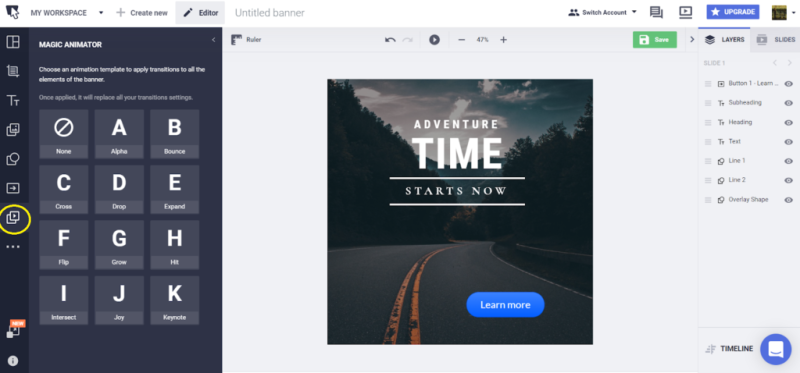
After you do this, you’ll see a few different transition options that you can apply to the template you’ve chosen.
As you’re going to notice, the objects will be animated one at a time, starting with the last one. If you want to change the order in which the objects are animated, then you can simply drag and drop it in the list from the animations timeline.
Use the animations timeline
This is an alternative to the Magic Animator, which will depend on your workflow. If you want to create something more complex, then you will love this feature.
For this example, I went for an animated template, then I went ahead and edited the text and opened the timeline that you can find at the bottom right corner of the editor.
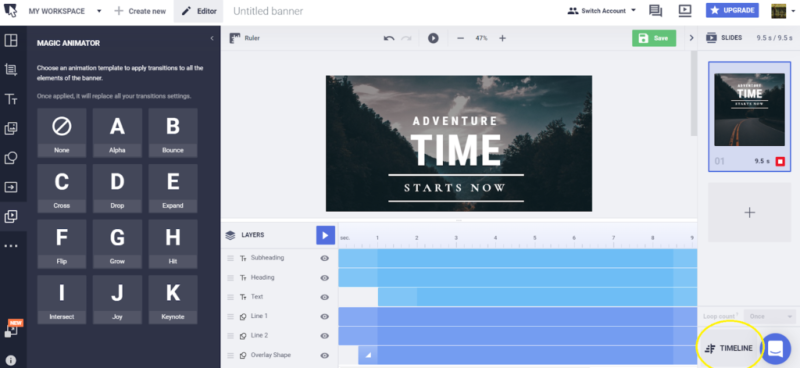
All the layers you have in your banner will be color-coded:
- Buttons are green;
- Text layers are blue;
- Shapes are purple;
- Images are orange.
For each layer, you have intro and outro effects. In Bannersnack, they are called Build inand Build out. You will be able to edit the effects from the right and left side of the bar.
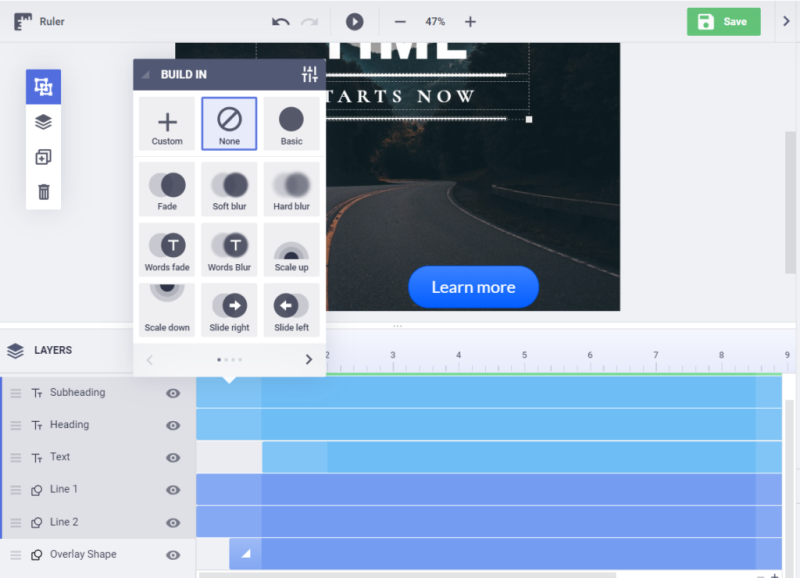
You can also edit the timing and duration of the transitions by simply dragging the edges of the boxes.
Moreover, you can change the duration of the entire animation from the bar that you can find at the top of the timeline.

Add more slides to an animation
By adding more slides to a banner, you will be able to create more complex animations. For example, you can use different images and keep the same objects to achieve a slideshow type of effect by simply duplicating it.
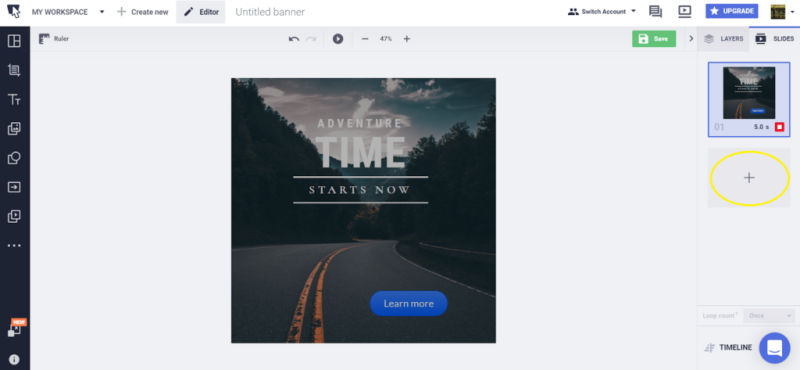
On the right side of the editor, you have the option to add however many slides you want, edit the duration, and transition effects between them.
At the bottom of this panel, you also have the Loopcount button, where you can set how many times you want your banner to roll.
If you’re looking for some inspiration, then watch the video below to see how you easy it is to create a Facebook ad using animated slides.
Preview your work before saving it
When you have the animations timeline opened, just hit the Space bar to play the animation you just created in preview mode. If you don’t have the Timeline opened, simply click the Play button circled in the screenshot below.
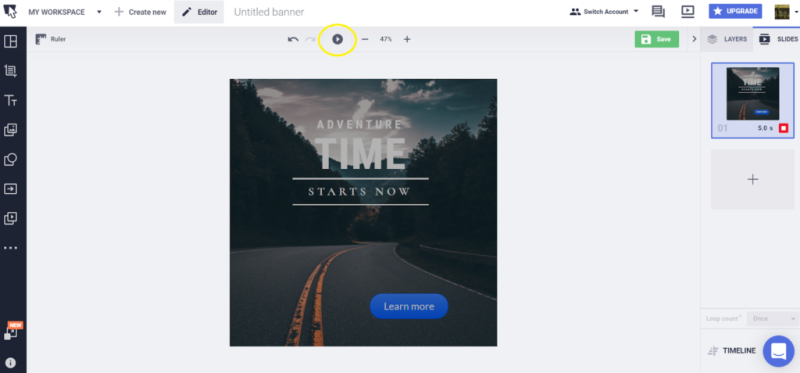
I strongly recommend using the preview feature, especially when you’re doing animations that have multiple slides so you don’t miss anything while editing.
Download your work
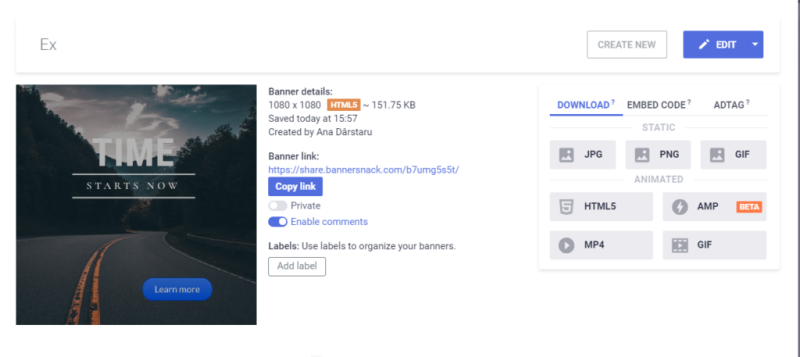
After you save your animation, you have two options: use the embed code or download the visual material.
The embed code is a great option when you want to add the animated content to your website and you plan on updating or changing the banner, without deleting the HTML code.
When it comes to downloading animated content, you have four different options to choose from:
- HTML5. This format is perfect for advertising campaigns on social media platforms because you can create the ads based on the HTML5 technologyusing interactive links.
- AMP. This is a new format, a much more lighter and faster version than the HTML5 technology. Even though the animations exported in AMP are smoother, they do have some limitations: blur effects are not supported and there are no loop options.
- MP4. This format will give you a 60fps video file and it can be pretty large. However, the quality is really good and can be used for various purposes. The video length is limited to two minutes.
- GIF. GIFs can be saved in two versions: high-quality GIFs (with a 15fps compression) and an optimized version (at 5fps). These type of animated banners can have up to 40 seconds in length. You can find herea helpful video on how to create a GIF with Bannersnack.
Conclusion
Nowadays, as a marketer and content creator, you not only need to create valuable and amazing written content but you also need to have a knack for visual materials.
Your goal is to generate engagement, hook your followers, capture your audience’s interest through eye-catching visuals and no sound.
I hope that my post will inspire you to start creating more animated visual content for social media (if you haven’t started already) and that you’ll also try Bannersnack.
Leave a comment with your suggestions and thoughts on animated content. I’m curious to know what you think about this topic.
 Saad Ullah
 Saad Ullah


